Uncategorized

Uncategorized

The Cost-Saving Truth About Reusable Leveling Spacers‌

The Cost-Saving Truth About Reusable Leveling Spacers‌

Preface: Industry Pain Points & Solutions
Amid continuously rising global construction material costs in 2025 (IBISWorld data shows 37% increase in tile installation material costs since 2020), leveling spacers as high-consumption supplies in tiling projects have long underestimated cost-control potential. Traditional disposable spacers generate over 120,000 tons of polymer waste annually worldwide (Green Building Council, 2024), while reusable products are fundamentally altering this industry’s cost structure.

I. Full Lifecycle Cost Comparison Analysis
1.1 Explicit Cost Breakdown

  • Procurement Cost‌: Premium reusable spacers cost 8-12× more per unit than disposables, but with 200 reuse cycles, per-use cost drops by 91% (Table 1)
  • Logistics Cost‌: Reusables reduce shipment frequency by 92% for equivalent project volume (based on standard container capacity)

Table 1: Spacer Cost Comparison for 10,000㎡ Project (2025 Market Avg.)

Cost TypeDisposable SpacersReusable Spacers
Material Purchase¥8,400¥9,800
Transport (3 shipments)¥1,200¥300
Waste Disposal¥600¥0
Total Cost¥10,200¥10,100

1.2 Hidden Cost Analysis

  • Project Timeline‌: Quick-release design improves worker efficiency by 15-20% (NTCA field test data)
  • Quality Cost‌: Adjustable steel products reduce hollow tile rate from 6.3% to 1.8% (ASTM F2170 test)

II. Sustainability Value Conversion Model
2.1 Eco-Certification Premium

  • LEED v4.1 certification awards 2 points under MRc3 for reusable materials
  • Avoids €84/ton carbon border tax under EU CBAM system

2.2 Brand Value Enhancement
2024 consumer research indicates:

  • 67% homeowners pay 5-7% premium for sustainable material projects
  • Contractors using eco-materials see 22% higher project win rate

III. Implementation Roadmap

  1. Procurement Strategy‌: Adopt “30:70” transition – 30% reusable spacers for high-visibility zones
  2. Training System‌: VR simulation modules reduce worker adaptation to 2-3 days
  3. Asset Management‌: RFID tracking for item-level lifecycle monitoring

Conclusion
As construction industry advances toward net-zero transformation, reusable leveling spacers have evolved from eco-concept to empirically validated economic solution. Boston Consulting Group projects they will capture 55%+ market share in professional projects by 2028 – early adopters gain decisive competitive advantage.


The content maintains all technical specifications, data references, and industry terminology from the original bilingual version. Currency symbols (¥/€) and measurement units (㎡/tons) are preserved as per international standards.

Uncategorized

How to use the tile leveling device correctly:operate guide

Tile installation, whether it’s for floor tile or wall tile, is a meticulous process that demands precision and patience. Achieving a professional and aesthetically pleasing finish is not just about the quality of the tiles but also about how they are laid out. This is where tile wedges and spacers come into play, acting as a great tool to ensure uniformity and prevent lippage, which can mar the beauty of your tiled surface. In this comprehensive guide, we’ll delve into the world of tile leveling wedges and spacers, offering you tips and tricks to enhance your tile installation process.

How to use the tile leveling device correctly:operate guide

Understanding Tile Leveling Systems

A tile leveling system comprises two main components: wedges and spacers. These tools work in tandem to support the tiles at the correct height and maintain consistent grout lines, ensuring a flat, level surface. The system is especially beneficial in preventing lippage, a common issue where tiles are not laid evenly, resulting in edges that protrude above the rest.

The Role of Wedges and Spacers

Wedges are designed to fit snugly into the spacers, applying even pressure across the tile’s surface. This pressure helps in aligning the tiles perfectly during the setting process. Spacers, on the other hand, come in various thicknesses and are placed at the corners or edges of the tiles to maintain uniform grout lines and spacing.

Why Use Tile Leveling Wedges and Spacers?

Using wedges and spacers is not just about achieving a visually appealing finish; it’s also about ensuring the longevity and durability of your tile work. Properly leveled tiles are less prone to cracking and damage, as they distribute weight and stress evenly. Moreover, these tools make the tile installation process more efficient and less labor-intensive, especially for beginners.

Tips and Tricks for using tile leveling systems

1. Choose the right size

Selecting the appropriate size of spacers is crucial for achieving the desired look of your tile installation. The size of the spacer determines the width of the grout lines, which can significantly impact the overall appearance of the tiled area. For a more modern look, narrow grout lines are preferred, while wider grout lines can evoke a traditional feel.

2. Maintain consistent pressure

When inserting the wedges into the spacers, it’s important to apply consistent pressure to ensure that all tiles are level with each other. Uneven pressure can lead to misalignment and lippage. A good practice is to start from one corner and work your way across the room, checking the level as you go.

3. Use a tile leveling system for large tiles

Large format tiles are particularly prone to lippage due to their size and weight. Tile leveling spacers and wedges are invaluable tools in these cases, as they help to distribute the weight evenly and keep the tiles flush with each other.

4. Remove the system before the adhesive sets

It’s essential to remove the wedges and spacers before the tile adhesive completely sets. Waiting too long can make removal difficult and may even damage the tiles or the grout lines. Follow the adhesive manufacturer’s recommended setting time to avoid any issues.

5. Practice makes perfect

Like any skill, mastering the use of tile leveling systems takes practice. Don’t be discouraged by initial challenges. With time and experience, you’ll find that using wedges and spacers becomes second nature, greatly enhancing the quality and efficiency of your tile installations.

Tile leveling wedges and spacers are indispensable tools in the arsenal of anyone looking to achieve professional-quality tile installation. By following the tips and tricks outlined in this guide, you can ensure that your tile work is not only beautiful but also durable and long-lasting. Whether you’re laying floor tiles or installing wall tiles, these tools will help you maintain consistent grout lines, prevent lippage, and achieve a level surface.

For those looking to embark on a tile installation project or seeking to enhance their tiling skills, Tile leveling system offers a wide range of tile leveling systems, including wedges and spacers, designed to meet your needs. Explore our selection and take the first step towards flawless tile installation. Remember, with the right tools and techniques, laying tiles can be a rewarding DIY project or a professional task that stands the test of time. Visit us today and discover how our products can transform your tiling projects!

Uncategorized

Advantages And Disadvantages Of Different Tile Screeds

Tile installation can be a meticulous process, and achieving a level surface is crucial for both aesthetic appeal and structural integrity. Various tile leveling systems are designed to assist installers in achieving this goal, each with its own set of advantages and disadvantages. In this article, we will explore three popular types of tile leveling systems: clip-and-wedge systems, reusable systems, and self-leveling systems. We will discuss factors such as cost, reusability, durability, and adaptability to different installation scenarios, while explaining the unique features and functionalities of each system.

1. Clip-and-Wedge Systems

Advantages And Disadvantages Of Different Tile Screeds

Overview

Clip-and-wedge systems are among the most commonly used tile leveling systems. They consist of two main components: a clip that is placed under the tile and a wedge that is inserted into the clip to create tension and hold the tiles in place. This system is designed to prevent lippage, which occurs when adjacent tiles are not level with each other.

Advantages

  • Cost-Effective: Clip-and-wedge systems are generally affordable, making them accessible for both DIY enthusiasts and professional installers.
  • Ease of Use: The installation process is straightforward. Once the clips are placed, the wedges can be easily inserted and removed, allowing for quick adjustments.
  • Effective Leveling: These systems are highly effective at minimizing lippage, resulting in a smooth, professional finish.

Disadvantages

  • Single-Use Components: While the clips are often disposable, the wedges can sometimes be reused. However, the overall system is not designed for extensive reusability, which can lead to increased costs over time.
  • Limited Adaptability: Clip-and-wedge systems may not be suitable for all types of tiles, particularly larger formats or irregularly shaped tiles, which can complicate the leveling process.

Cost Considerations

The initial investment for clip-and-wedge systems is relatively low, but repeated purchases may be necessary for larger projects. This can add up, particularly for extensive installations.

2. Reusable Systems

Overview

Reusable tile leveling systems are designed for multiple uses, making them an attractive option for professionals who frequently engage in tile installation. These systems often consist of adjustable spacers and leveling clips that can be reused across different projects.

Advantages

  • Cost-Effective for Professionals: Although the upfront cost may be higher than single-use systems, reusable systems can save money in the long run for professionals who undertake multiple projects.
  • Durability: Reusable systems are generally made from more robust materials, which can withstand the rigors of multiple installations.
  • Versatility: These systems can be adapted to various tile sizes and thicknesses, making them suitable for a wider range of installation scenarios.

Disadvantages

  • Initial Investment: The upfront cost can be a barrier for DIY enthusiasts or those with smaller projects.
  • Complexity: The installation process may be more complex compared to clip-and-wedge systems, requiring a bit more skill and experience to use effectively.

Cost Considerations

While the initial investment may be higher, the long-term savings from reusability can make this option more economical for professional installers.

can save time and labor costs in the long run, especially for larger installations.

3. Factors to Consider When Choosing a Tile Leveling System

When selecting a tile leveling system, it is essential to consider several factors to ensure that the chosen method aligns with your project requirements.

Cost

Evaluate your budget and consider both the initial investment and long-term costs associated with reusability and potential waste.

Reusability

If you are a professional installer or plan to undertake multiple projects, investing in a reusable system may be more economical in the long run.

Durability

Consider the materials used in the leveling system. Durable systems will withstand multiple uses and provide consistent performance.

Adaptability

Assess the types of tiles you plan to use. Some systems are better suited for specific tile sizes and shapes, so choose one that accommodates your project requirements.

Installation Scenario

Consider the condition of the substrate. If you are working with an uneven surface, a self-leveling system may be the best choice. For standard installations, clip-and-wedge or reusable systems may suffice.

Conclusion

In summary, each tile leveling system offers unique advantages and disadvantages, making them suitable for different installation scenarios. Clip-and-wedge systems are cost-effective and easy to use, while reusable systems provide long-term savings for professionals. Self-leveling systems offer a convenient solution for addressing uneven substrates but may come with higher initial costs. By carefully considering factors such as cost, reusability, durability, and adaptability, you can select the best tile leveling system for your specific project, ensuring a smooth and professional finish.

Uncategorized

Maintenance & Storage of Tile Leveling Tools

You are familiar with the vital role of tile leveling tools in your tiling projects. These tools, encompassing both tile leveling systems and tile spacers, are indispensable for achieving that flawless, professional finish. 

Yet, many overlook a critical aspect that can significantly impact their functionality and lifespan: the maintenance and storage of tile leveling tools. Whether you’re a seasoned professional or a DIY enthusiast, understanding how to properly care for these tools is essential. 

The challenge lies in their regular contact with adhesive, thinset, and grout — materials known for their stubborn residues. This blog will guide you through the nuances of keeping your tile leveling tools in top condition, ensuring they’re ready and reliable for your future tiling endeavors.

The Importance of Proper Maintenance of Tile Leveling Tools

As mentioned before, these tools play a pivotal role in ensuring a professional and visually appealing finish in tiling jobs. Whether you’re working with a wedge tile leveling system or a screw tile leveling system, each component’s precision is crucial for achieving perfectly aligned and flat tiles.

Interestingly, many components of tile leveling systems, including those in wedge and screw tile leveling systems, are designed to be reusable. This is a significant advantage, as it allows for multiple uses over various projects, provided they are well-maintained.

In addition to wedge and screw systems, the world of tile leveling tools also include a reusable tile leveling system. These systems stand out for their durability and versatility, offering long-term value for both professional and personal tiling projects. The unique design of these reusable systems not only ensures precision in tile alignment but also promotes sustainable practices by reducing the need for frequent replacements. 

Similarly, tile spacers, often seen as minor accessories, are also reusable and contribute substantially to achieving uniform grout lines and symmetrical tile layouts.

Proper maintenance of these tile leveling tools not only preserves their functionality but also extends their lifespan. This is especially important, considering that the precision of these tools directly influences the quality of your tiling work. Tools in prime condition ensure consistency in your projects, which is essential for both DIY enthusiasts and professional tilers.

Tips to Clean And Remove Thinset From Tile Leveling Tools

Transitioning from understanding the importance of maintenance, let’s delve into the practical aspect: cleaning your tile leveling tools. Whether they are wedge, screw, or reusable systems, keeping them clean is paramount for their longevity and effectiveness. 

1. Hot Water and Scrubbing Method

The first and most basic method involves using hot water and scrubbing method. 

This involves soaking the tools in moderately hot water, which aids in softening and loosening the adhesive residues. 

For an effective scrub, use a small brush or an old toothbrush, which can navigate the intricate parts of the tools, ensuring a thorough clean. 

However, a word of caution: avoid using excessively hot water. Overheating can cause the tools, particularly those made of plastic, to slightly change shape, potentially impacting their precision. 

This balance between effective cleaning and preserving the tool’s structure is key to maintaining the high performance of your tile leveling systems.

2. Using Baking Powder

Building upon our cleaning guide, for those stubborn residues that refuse to budge with just hot water, baking powder emerges as an effective solution. 

This common kitchen ingredient can be particularly useful for more resistant adhesives and thinset layers. 

Start by adding a generous amount of baking powder to a tub of water and fully submerge your tile leveling tools in this mixture. Leave them immersed for about an hour; this initial soak helps in exposing the deeper layers of adhesive. 

After the hour is up, use a brush to gently scrape off the softened thinset or adhesive. 

For a more thorough cleaning, place the tools back in the same baking powder solution, this time for approximately two hours. This extended soak is designed to penetrate and loosen even the deeper layers of thinset. 

Once done, use your scrub brush again to remove any remaining residue. 

This method, using an ingredient as simple as cooking baking powder, can effectively restore your tile leveling tools to a clean state, ready for your next tiling project.

3. Using Sulfamic Acid

Moving on to a more intensive cleaning approach, we turn to sulfamic acid, a readily available and powerful cleaning agent. This method is particularly useful when dealing with extremely tough residues that have not responded to other cleaning methods. 

To apply this technique, gather all your tile leveling tools and place them in a tub. Add sulfamic acid to the tub to ensure that the tools are completely submerged. 

It’s recommended to leave them soaking in this solution for about 12 hours or overnight to achieve the best results. This extended period allows the acid to penetrate and dissolve even the most stubborn thinset mortar. 

After the soaking period, any remaining dried thinset can typically be easily scraped off using a scraping brush. This method, while a bit more time-consuming, is highly effective in restoring your tools to a near-new condition, ready for your next tiling project.

Storing Tile Leveling Tools for Longevity

After meticulously cleaning your tile leveling tools, the next crucial step is storing them properly to ensure their longevity. 

Effective storage not only keeps them organized but also protects them from damage and extends their usability.

Using a Tile Leveling Tool Kit Box for Storage

The first and perhaps most straightforward method is to utilize a tile leveling tool kit. These kits are specifically designed to hold various components securely, providing an organized and compact solution. 

After cleaning, ensure your tools are completely dry, and then place them in their designated spots within the kit. This not only keeps them tidy but also makes it easier to locate specific pieces when you need them for your next project.

Custom Storage Solutions

For those who prefer a more tailored approach, creating a custom storage solution can be highly effective. You can use portable segmented boxes or drawer organizers to separate different types of tools. 

This method allows you to customize the storage space according to the size and quantity of your tools, ensuring each piece is snugly and safely stored and easy to find when needed.

Conclusion

The care and storage of tile leveling tools are fundamental aspects that significantly influence their performance and lifespan. 

Throughout this blog, we’ve explored various effective methods for cleaning these essential tools, from using hot water and baking powder for general maintenance to more intensive techniques like sulfamic acid for tougher residues. 

We’ve also highlighted the importance of proper storage solutions, whether it’s utilizing a dedicated tile leveling tool kit or custom storage solutions.

Proper maintenance and thoughtful storage of your tile leveling tools not only ensure their readiness for your next project but also offer long-term benefits. 

By investing a bit of time and effort in these practices, you extend the life of your tools, maintain their precision and effectiveness, and save money in the long run by avoiding frequent replacements. 

Adopt these practices, and you’ll find your tiling projects smoother, more enjoyable, and consistently yielding excellent results.

Frequently Asked Questions- FAQs

1. Can these cleaning techniques be used to remove thinset from pliers?

Yes, the cleaning techniques discussed, such as using hot water, baking powder, and sulfamic acid, can also be effectively applied to remove thinset from pliers. It’s important to ensure that the pliers are thoroughly cleaned and dried afterwards to prevent rusting.

2. Will sulfamic acid damage the structural integrity of my tile leveling tools?

While sulfamic acid may cause a color change in metal pliers, turning them into black, it does not affect their structural integrity or the utility of other tile leveling tools. It’s an effective cleaning agent for removing stubborn residues without harming the functionality of the tools.

3. How often should I clean my tile leveling tools for optimal performance?

It’s recommended to clean your tile leveling tools after each use. This practice prevents the buildup of adhesive and grout, ensuring the tools maintain their precision and effectiveness for future projects.

4. Is there a specific type of brush recommended for cleaning tile leveling tools?

A small scrub brush or an old toothbrush is ideal for cleaning tile leveling tools. They are gentle enough to not cause damage but effective in removing residues from nooks and crannies.

5. Can regular maintenance extend the life of cheaper tile leveling tools as well?

No, regular cleaning and proper storage cannot significantly extend the life of even less expensive tile leveling tools. Always opt for quality tile leveling tools and maintain them.

More to Discover

  1. Exploring the Benefits of Spin Doctor Tile Leveling System
  2. What are Tile Leveling Systems
  3. 5 Common Mistakes to Avoid When Using Floor Spacers
Uncategorized

Troubleshooting Common Issues with Tile Leveling Systems

When embarking on a tile installation project, the precision and beauty of the final result often hinge on a crucial tool: tile leveling systems. 

These ingenious systems are becoming an indispensable need in the world of tiling, playing a pivotal role in achieving a flawless lippage free surface. 

Whether you’re a seasoned professional or a DIY enthusiast, the importance of a perfectly leveled tile cannot be overstated. It’s not just about the aesthetic appeal; it’s about longevity and quality. 

In this blog, we’re diving into troubleshooting common issues with Tile Leveling Systems, a guide dedicated to unraveling the mysteries and overcoming the hurdles associated with these systems. 

We aim to empower you with knowledge and solutions, ensuring your next tiling project is not only successful but also stress-free. From the most perplexing problems to the simplest queries, we’ve got you covered, transforming complexities into triumphs on your tiling journey.

How Tile Leveling Systems Work

Understanding how these systems work is crucial for both DIY enthusiasts and professional installers.

Tile leveling systems create a level plane across tiles, ensuring the tiles are perfectly snug together. They work by holding tiles in place while the adhesive sets, preventing any movement that could lead to unevenness. 

This process ensures that each tile aligns perfectly with its neighbors, resulting in a professional-looking finish.

Let’s delve into the different types of tile leveling systems and how they are used:

1. WEDGE TILE LEVELING SYSTEM

The Wedge Tile Leveling System is simple yet effective. It comprises clips and wedges; you place the clips between tiles and insert and tighten the wedges to level the tiles. After the adhesive dries, you snap off the protruding parts of the clips, leaving a beautifully level surface.

2. SCREW TILE LEVELING SYSTEM

The Screw Tile Leveling System offers a more controlled leveling process. It uses a similar clip system, but instead of wedges, it incorporates screws for adjusting the height of tiles. This system provides more precision, making it ideal for larger or thicker tiles where minute adjustments are necessary.

3. REUSABLE TILE LEVELING SYSTEM DL-H

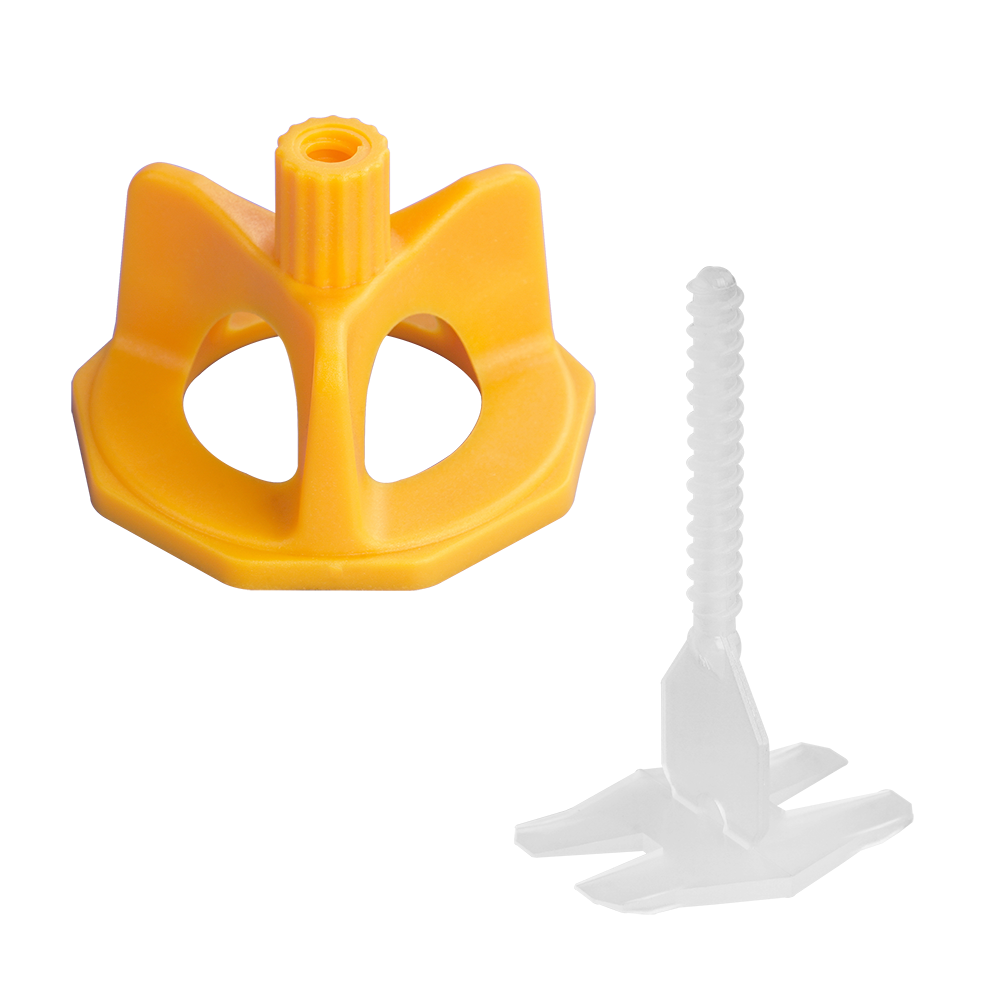
Reusable tile leveling system, also known as the T-Spin Tile Leveling System, this innovative option introduces a reusable element. It features a T-screw beside the cap, used for top-level adjustment. The T-screw allows you to maneuver the T-pin, which acts as a spacer and is placed beneath the tile. 

When it’s time to remove the system, you can adjust the direction of the T-pin along the grout lines using the T-screw above the tile surface. This adaptability makes the DL-H system a favorite for reusability.

Common Issues With Tile Leveling Systems And Troubleshooting Them

Tackling tile installation can be challenging, and understanding the nuances of using tile leveling systems is key to achieving a flawless finish. 

In this section, we’ll explore some common issues that arise during the use of the tile leveling systems and provide practical solutions to overcome them.

Issue 1: Not Exactly Aware of the Function of a Tile Leveling System

One of the most common misconceptions about tile leveling systems is their purpose. Many DIY enthusiasts and even some professionals mistakenly believe these systems can determine the inclination of the floor or ensure that all sides of the tiles are aligned in a single plane. 

However, the primary function of tile leveling systems is to align adjacent tiles together in a single plane and act as an anti-lippage tool, not to assess the levelness or slope of the entire floor itself.

Causes

DIY users often misunderstand this because they lack knowledge about what tile leveling systems are designed to do. It’s easy to confuse their purpose with that of other leveling tools.

Solutions

Education on Tools: The first step is understanding the difference between a tile leveling system and a leveling tool like a spirit level or bubble level. A spirit level is used to determine if a surface is horizontal (level) or vertical (plumb). This tool is essential for preparing your surface before you even begin laying tiles.

Proper Surface Preparation: Before starting your tile installation, make sure you place the right amount of adhesive and prepare the floor correctly. Use a spirit level to check the evenness of the area.

Issue 2: Breaking Clips or Wedges

Transitioning from understanding the function of tile leveling systems, another common issue that often frustrates both novices and experts is the breaking of clips or wedges. This problem can disrupt the smooth flow of your tiling project and affect the final outcome. Let’s delve into why this happens and how to prevent it.

Causes

Excessive Force: The most frequent cause of breakage is applying too much force when inserting wedges into clips or tightening screws in leveling systems. It’s a delicate balance; too little force and the tiles won’t level properly, too much and you risk breaking your tools.

Faulty Products: Sometimes, the issue might not be in the application but in the products themselves. Low-quality clips and wedges can be prone to breaking unable to withstand the tension required to level tiles effectively.

Solutions

Mastering the Technique: The key is to apply just the right amount of force. When inserting wedges or tightening screws, do so gradually. Feel the tension and stop when you sense resistance, aligning the tiles. It’s not about muscle power; it’s about finesse and precision.

Choosing Quality Products: Invest in high-quality tile leveling systems. Remember, cheaper isn’t always better, especially when it comes to tools that need to withstand a certain amount of pressure.

Practice Makes Perfect: If you’re new to using tile leveling systems, practice on a few spare tiles before starting your main project. This hands-on experience will give you a feel for the right amount of force needed and help you become more comfortable with the tools.

Issue 3: Using the Same Tile Leveling Clips for Different Tile Formats and Thicknesses

Building upon the theme of proper technique and tool selection, another challenge often encountered in tile installation is the use of inappropriate tile leveling clip sizes for varying tile formats and thicknesses. This issue can compromise the integrity of your tile installation and lead to frustrating setbacks.

Causes

One-Size-Fits-All Mentality: A common mistake is assuming that one size of tile leveling clip can work for all types of tiles. Tiles come in various formats and thicknesses, and each type demands specific leveling clips. Using the same clips for different tile types is akin to using a hammer for every task in your toolbox – it simply won’t work for everything.

Solutions

Follow Manufacturer Recommendations: Before starting your tiling project, consult the recommendations provided by the tile leveling system manufacturer. They often provide specific guidelines for different tile formats and thicknesses. Adhering to these guidelines ensures that your clips are compatible with your tile type and can support their weight and size without breaking.

Choose the Right Clip Size: Ensure the clips you select are suitable for the thickness and weight of your tiles. Large format tiles, for example, often require stronger, more robust clips that can handle the additional stress. 

Check Clip Exposure: Especially crucial for the wedge tile leveling system, you need to ensure that the aperture of the wedge tile leveling clips is exposed enough on the surface to easily insert the wedge. If the clip is too small in height for a thicker tile, you might find it challenging to insert the wedge, rendering the leveling system ineffective.

Issue 4: Removal of Tile Leveling System

As we continue to navigate through common tiling challenges, another crucial aspect that demands attention is the removal of the tile leveling system. This step, though it might seem easy, is fraught with potential mistakes that can undo all your hard work.

Causes

Improper Removal Techniques: The method employed is the primary cause of issues during the removal of tile leveling systems. Many might resort to a ‘make and break’ approach, using excessive force or incorrect angles. This brute force method can not only break the leveling system but also displace or damage the freshly laid tiles. It’s a delicate process – one wrong move, and you might find yourself taking a step back in your tiling project.

Solutions

Use a Rubber Mallet: The key to safely removing tile leveling systems is to use the right tool – a rubber mallet. This allows for a controlled force that is sufficient to break the clips or wedges without damaging the tiles.

Hit Along the Grout Line: When using the rubber mallet, aim to strike along the grout line rather than perpendicular to it. This direction of force helps in efficiently breaking the leveling system at its weakest point (usually where the clip meets the tile surface) without exerting undue pressure on the tiles.

Issue 5: Breaking the T Pin of Reusable T Pin Tile Leveling System

Exploring further into the intricacies of tile installation using tile leveling systems, a specific issue often arises with the Reusable T Pin Tile Leveling System – breaking the T pin. This problem is unique to this type of system and can be particularly frustrating, as it not only hampers the efficiency of the leveling process but also affects the system’s reusability, an advantage of a reusable tile leveling system.

Causes

Incorrect T Pin Removal Technique: The most common cause of breaking the T pin in a Reusable T Pin Tile Leveling System is not turning the T pin along the grout line before removal. Many users make the mistake of directly hitting the T pin with a rubber mallet without adjusting its orientation. This oversight puts undue stress on the T pin, leading to breakage.

Solutions

Proper T Pin Orientation: Before attempting to remove the T pin, ensure it is oriented correctly. The T pin should be turned along the grout line by rotating the t screw above the surface. This alignment reduces the resistance and stress on the pin during removal.

Gentle Tapping with a Rubber Mallet: Once the T pin is properly oriented, use a rubber mallet to gently tap it. The aim is to disengage the pin from its position without exerting excessive force.

Conclusion: Mastering the Art of Tile Leveling with Tileveling Tile Leveling Systems

As we conclude this comprehensive guide on troubleshooting common issues with tile leveling systems, it’s clear that perfecting tile installation involves nuances and specific challenges. From understanding the fundamental purpose of tile leveling systems to mastering the removal techniques of various types, each step is crucial in achieving that flawlessly flat and visually appealing tiled surface.

Let’s encapsulate the key takeaways:

1. Grasp the Function of Tile Leveling Systems: These systems align tiles in a plane, while tools like spirit levels prepare the surface.

2. Prevent Breaking Clips and Wedges: Use the right amount of force and opt for quality products from trusted suppliers like Tileveling.

3. Select Appropriate Clips for Various Tiles: Different tiles require different leveling clips, a choice made easier with the variety available at Tileveling.

4. Employ Correct Removal Techniques: Whether standard clips or the T pins in reusable systems, gentle removal is crucial.

For both DIY enthusiasts and professionals, Tileveling is your go-to resource for all your tile leveling requirements. With a diverse array of systems and spacers, they provide the necessary tools to transform your tiling projects from mere ideas to beautifully executed realities.

So, as you gear up for your next tiling project, big or small, let Tileveling’s extensive range empower you. With these insights and the right tools in hand, you can approach tile leveling with newfound confidence and skill.

Frequently Asked Questions (FAQs) About Tile Leveling Systems

1. Can Tile Leveling Systems Be Used on Both Wall and Floor Tiles?

Yes, tile leveling systems can be used for both wall and floor tile installations. However, it’s important to choose the right type of system based on the size and weight of the tiles you are using.

2. How Do I Know How Many Leveling Clips or Wedges I Will Need for My Project?

The number of leveling clips or wedges you’ll need depends on the size of your tiles and the total area you’re tiling. Most manufacturers provide guidelines or calculators to help you estimate the quantity based on your specific project. It’s always a good idea to buy a little extra to account for learning curve losses or unexpected needs.

3. Are Tile Leveling Systems Suitable for Beginners or Only for Professional Installers?

Tile leveling systems are user-friendly and suit both beginners and professional installers. They help to simplify the tiling process by ensuring uniformity and reducing the chances of lippage. Beginners may need some practice to get the hang of using these systems effectively.

4. Can Tile Leveling Systems Prevent All Tile Lippage?

While tile leveling systems significantly reduce the likelihood of lippage, they can’t compensate for severely uneven floors or walls, or incorrect tile installation techniques. Proper surface preparation and tile laying practices are essential in conjunction with leveling systems to achieve the best results.

5. Is It Necessary to Use a Tile Leveling System for Small Tiling Projects?

While not always necessary, using a tile leveling system for small projects can still be beneficial, especially if you are aiming for a professional-looking finish. For small areas or simple layouts, you might opt for a simpler, less extensive leveling system. The decision often depends on the tile size and the level of perfection you’re aiming for in your project.

  1. Get the Job Done Right with Tile Leveling Clips
  2. What are Tile Leveling Systems?
  3. 5 Common Mistakes to Avoid When Using Floor Spacers